1. Define Your Pouch Dimensions
Enter the desired finished size of your pouch (Width, Height, and Length) and choose your seam allowance.
Leave at 0.0 unless your zipper method requires adjustment. See note below for details.
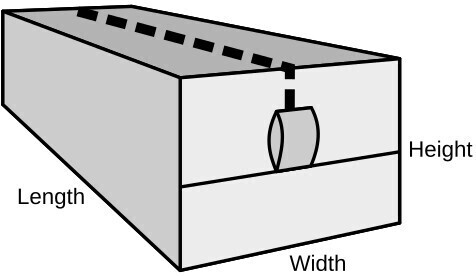
W = Width, H = Height, L = Length.
Seam Allowances
Recommended Seam Allowances
| Inches | Centimeters |
|---|---|
| 0.375 (3/8") | 1 cm |
| 0.5 (1/2") |
Pro Tip: Zip Seam Allowance (ZSA)
If you sew in the middle of the half of the zipper you are working on, you typically don't need any zipper seam allowance, because the finished panel width overall remains the same. For a #5 zipper, this means sewing with a ~5/16 inch (8mm, quarter of the zip tape width) seam allowance.
If you are using very different zipper sizes (e.g., tiny #3 coil zips) or highly unusual seam allowances, you can adjust the ZSA box above, but the difference in overall volume is usually negligible.
2. Your Cut List & Volume
Fabric Cutting Dimensions
Fabric Width (Zipper Edge):
--
Fabric Height:
--

Estimated Capacity
Pouch Volume:
-- Litres
Useful tip: this is a minimum volume estimate that doesn't account for bulging.
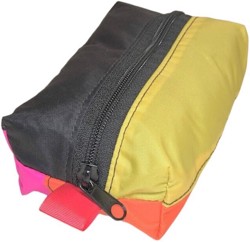
3. Step-by-Step Sewing Instructions
Ready to turn your numbers into a finished pouch? Follow these steps for constructing the classic boxed zipper pouch.
1
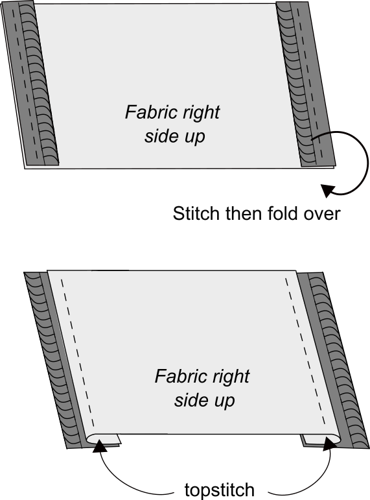
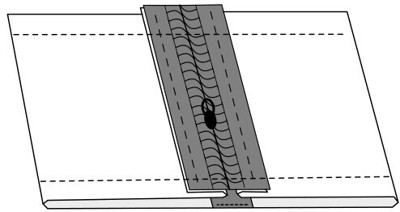
Attach the Zipper
Sew a zipper half to each fabric half along the long edge. Always sew the zipper *upside down* first, then fold it over the stitch line and topstitch it down for a clean finish.
For a waterproof zip, upside down means the shiny tape touches the fabric, teeth pointing upwards. For a normal coil zipper, the teeth touch the fabric.
2
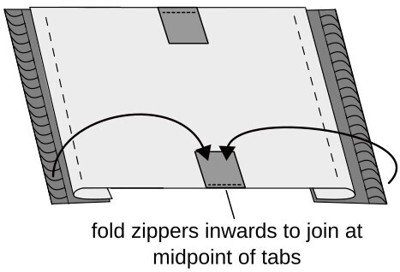
Add Tabs & Fold
Basting stitch a folded piece of 2.5" to 3" (~7cm) grosgrain ribbon at the zipper midpoint to form the pull tabs/attachment loops. Use a narrow seam allowance for this stitch, e.g. 1/4 inch (6mm).
Next, fold the entire piece inwards to join the two sides of the fabric, ready for closing the seam.
3
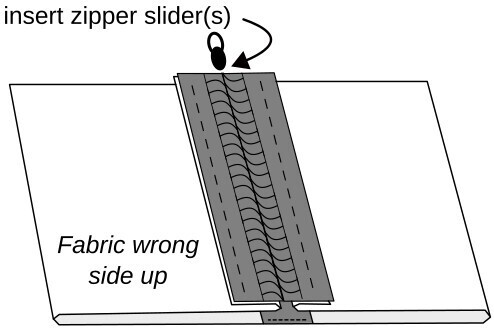
Insert the Slider(s)
Insert your zipper slider (or two sliders on the opposite sides). Since the bag is inside out, ensure the slider is oriented correctly.
Tip: If using a single slider, insert it twice: first to fully close the zipper, then pull it off and re-insert it, leaving it halfway across the zip. This means the two ends in the seam allowance are closed, for even sewing.
4
Sew the Sides & Reinforce
Sew the two open sides using your chosen seam allowance. Go back and forth (bar-tack) over the zipper tape for reinforcement.
Before sewing the second side, reach through and partially open the zipper. This will help to invert the finished bag, especially if you have a stiff zip!
Optionally you can finish the edges by folding the seam allowance back and stitching flat, by binding with grosgrain ribbon, or running a zig zag stitch to capture the raw edge.
5
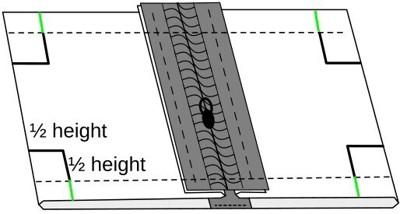
Mark the Boxed Corners
Using a pencil or chalk marker that won't seep through the fabric, lightly mark out 4 squares at each corner. The sides of these squares must be half the desired bag Height (H) calculated in Step 1.
Ensure these squares are marked between the two side stitches.
6
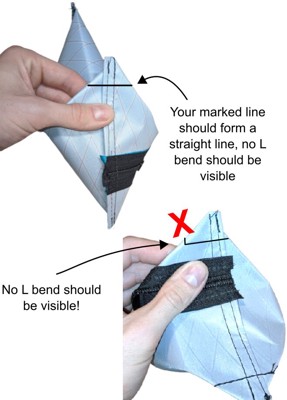
Form the Box
Pull and pinch each of the 4 corners into a 3D shape, aligning the marked lines to form triangles.
The lines you drew should not have a visible L corner kink to them, they should be straight across the fabric. A bend means you will have a wonky corner when sewn.
7
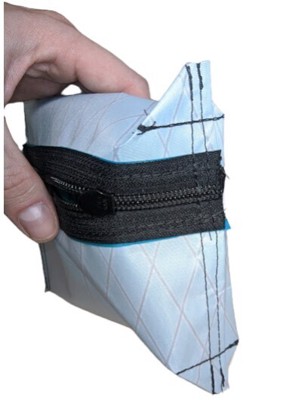
Form and Sew the Box
Sew along all 4 of these marked lines.
If you are making a larger bag, clip off excess fabric from the triangles (leaving a good 1/2" seam allowance) and reinforce with extra stitching if desired.
🎉 Finished!
Reach inside the opened zipper and invert your bag right side out. Enjoy your perfectly sized, custom-made pouch!