Corners and curves can cause so many problems for beginners, but with good technique they are worth the effort.
Accurately maintain your seam allowance as the pattern will be designed around this. Your sewing machine will nearly always have markings on the needle plate to help you maintain the required seam allowance, and you can also get magnetic or screw on seam allowance guides.
Draw the seam line on your fabric if you are struggling. This will be the seam allowance distance inwards from the fabric edge, usually ½ inch in these Prickly Gorse sewing guides. Then sew along this line. If you are accurate, the drawing will be completely hidden when you invert the bag. You could mark the seam line with chalk or similar washable marker.
Curves are just a series of short straight stitches. Work a few stitches at a time. Go slow, keep checking how things are lining up as you go along.
Shorten your stitch length. A series of 1 cm long stitches will make a very ugly angular curve, but a series of 1mm stitches would make a super smooth curve. Smaller stitches also mean you can’t get too carried away and sew too far out of control. I usually use 3mm when doing tight curves.
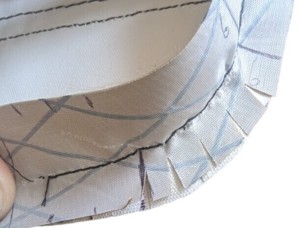
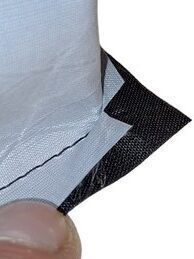
Use relief cuts. Depending on which piece is on top, the seam allowance tends to fold on itself and get in the way of your seam line. Relief cuts are small snips within the seam allowance that help when sewing curves or tight corners. They allow the fabric to bend easier, both significantly helping with constructing the bag, and making the final product look sharp, crinkle free and professional. Don’t snip all the way to the seam line or the stitches can pull out, causing a seam failure. If your fabric is prone to fraying, minimise how far you cut your relief snip.
Relief cuts are especially useful when sewing 90 degree corners
Even when your design includes a 90+ degree corner consider ‘rounding’ off the corner by a single stitch. This breaks it into two smaller easier 45 degree turns, and takes a bit of strain off the fabric.
Which fabric piece on top? When sewing a gusset to a side panel, e.g. the middle strip around the perimeter of a bike frame bag, you can either have the straight gusset piece on top or below. For bags with sharp corners, I prefer gusset on top, and usually use a few relief cuts to make them easier. For curves, I prefer having the gusset on the bottom, aligned with the seam allowance markings on your sewing machine, and rotating the side panels around on top.
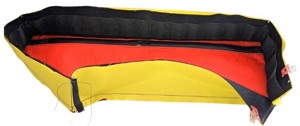
This red and yellow frame bag example was sewn gusset on top, which I tend to prefer if there are sharp angles. Relief cuts are extremely helpful to make these turns.
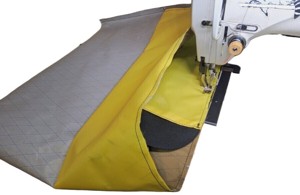
This photo shows the gusset on the bottom, and the base panel is on the top. The base consists of two large curves, and is ideal for this way around. All you have to do is keep the gusset aligned with your seam allowance markings on your needle plate (black tape on my machine) and gently rotate the other panel around on top. This requires a bit of bag rotating gymnastics if doing large projects, but even with this caveat, I prefer this to relief cuts!
Experiment and see which way works best for yourself!
Crisp Corners and Crinkle-less Curves. Snip off some of the excess seam allowance at the corner points and the curves after sewing to make them nice and crisp when pushed out. Adding a few relief cuts across curved sections can also help. In the relief cut photo above the bottom black fabric’s corner could be snipped down a bit, leaving at least ¼ to 3/8 (6 to 9mm) seam allowance. Keep a larger seam allowance for fabrics that tend to fray, like cotton duck and uncoated Cordura-type fabrics.